Example ideas:
http://design.tutsplus.com/tutorials/create-a-super-happy-octopus-character--vector-15
http://abduzeedo.com/simple-roy-lichtenstein-style-illustrator-and-photoshop
http://abduzeedo.com/double-exposure-style-photoshop
Create a Wallpaper Background
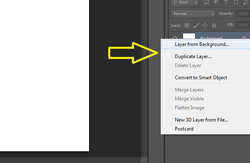
Salutations Students. Let's start by creating a new document. I'm going to use a Height of 600 pixels and a Width of 800 Pixels. This is Canada so you can choose whatever size you want. Next I right click on the background layer and click "Layer from background"
Salutations Students. Let's start by creating a new document. I'm going to use a Height of 600 pixels and a Width of 800 Pixels. This is Canada so you can choose whatever size you want. Next I right click on the background layer and click "Layer from background"
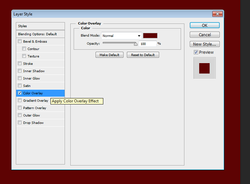
Still with me? Ok, Good. Now we can right click on our new layer from background, and choose "blending options" at the top of the list. Now I'm going to choose a "color overlay". Now you can click on the color box beside "normal" and choose a color. Choose a dark color because our light effects will show up better. I'll choose a darkish red.
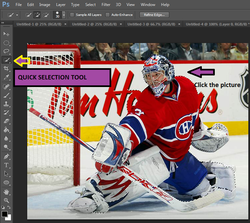
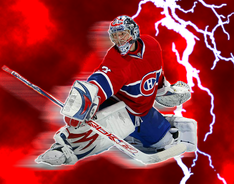
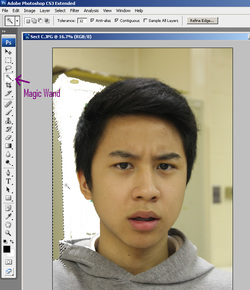
Our next step is to go to the Googling Machine and choose a photo we want to put into our background. I'm going to find a picture of Everyone's favourite Team Canada Goalie, Carey Price. Save your picture somewhere on your computer. Next go back to Photoshop, and click FILE and then OPEN. Find the picture that you just saved and it should open in a new selection. Next use your Quick Selection Tool and highlight the parts of the picture you want to keep. A dotted line shows what you selected.
NOTE: You might have to use the LASSO or Magic Wand to help you select your picture
TIP: Holding down SHIFT adds to your selection. HOLDING "ALT" minuses your selection.
NOTE: You might have to use the LASSO or Magic Wand to help you select your picture
TIP: Holding down SHIFT adds to your selection. HOLDING "ALT" minuses your selection.
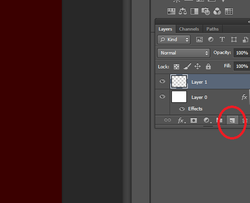
Now go back to your coloured background and create a new layer. You can click down on the layer task (I circled it in the picture) or just right click and select new layer
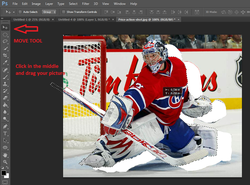
We can now drag our Gold medal winning picture of Carey Price onto our newly created layer. Click on the move tool at the top. and drag it into your background tab.
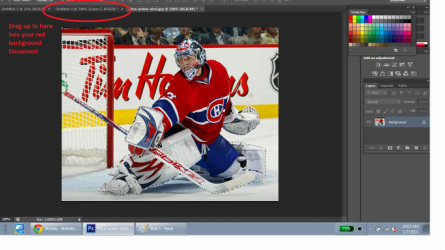
Drag it all the way up to your background layer and drop it in the middle by letting go
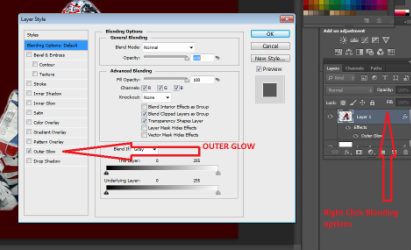
Next right click on your picture and go to BLENDING OPTIONS
Now tick the OUTER GLOW box on the left
Now tick the OUTER GLOW box on the left
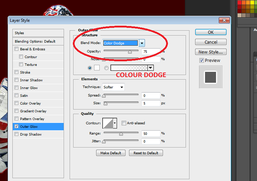
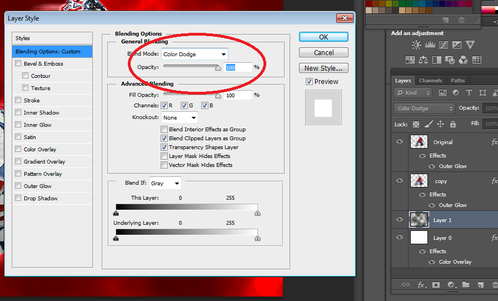
NEXT click on the drop down bar and change it from NORMAL to COLOR DODGE. This should give you a coloured glow that matches your picture
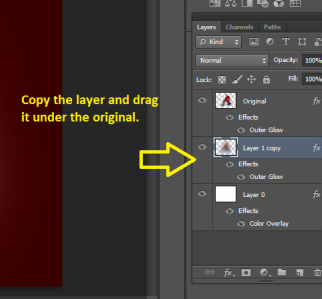
Next right click on your image and select duplicate layer. Now you have 2 Gold Medal winning goaltenders. Now drag your layer 1 copy so it's under the Original.
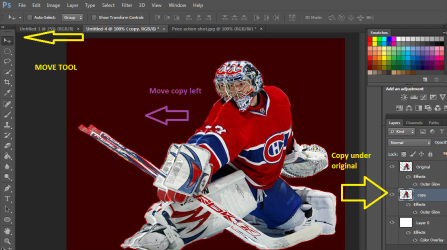
Now with the copy under the original, use the move toolbar on the top left toolbar and select the move tool again. Move the picture to the left so you can see a duplicate.
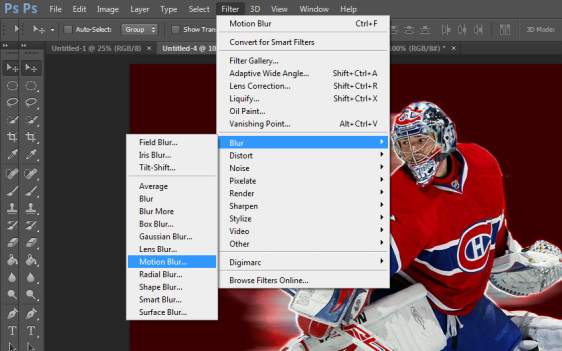
With the copy still selected, go to the top and select FILTER then go down to BLUR and then MOTION BLUR
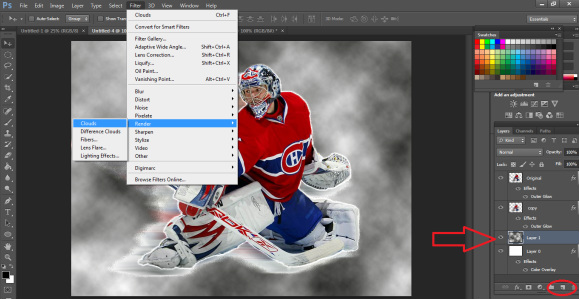
Now create another new layer like before by click on the shortcut circled in red. Move it under the copy layer.
NEXT go to the top and select FILTER --> RENDER --> CLOUDS
NEXT go to the top and select FILTER --> RENDER --> CLOUDS
Now right click on the cloud layer and go to Blending Options again and select Colour Dodge
Creating Lighting in Photoshop
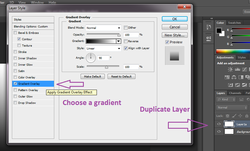
Step 1: Create New File. Right click on the Background and duplicate the layer. On this New Layer, right click and go to Blending options. Choose Gradient Overlay and
Step 2 kids
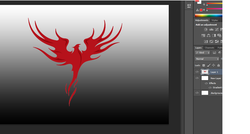
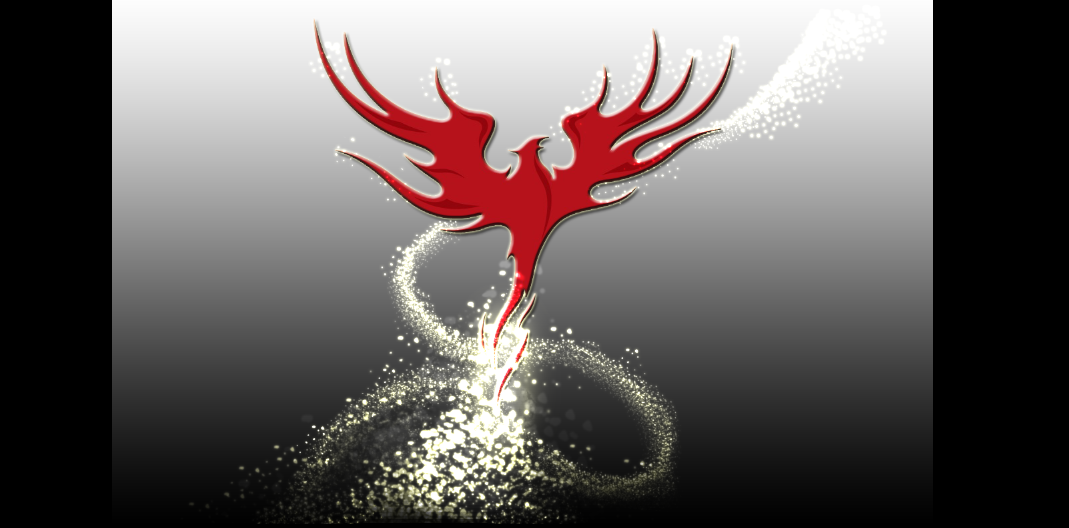
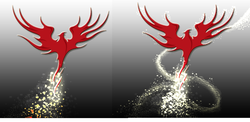
Step 2: Import an image where you want to create a lighting effect around. I have chosen the spectacular Carver Phoenix, pride and tasteful, soaring through the skies. Soar oh Phoenix, Soar.
Use the magic wand and with the MOVE selection tool, drag it into your gradient background.
Use the magic wand and with the MOVE selection tool, drag it into your gradient background.
Step 3
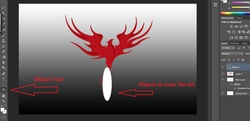
Step 3: High Five someone, then using the ellipses or any other shape that looks beatutiful, create a shape on the area where you want to light up the world like nobody.
NOW with the shape selected, go up to the top Gaussian Blur (Filter>Blur>Gaussian Blur)
I chose 21 pixels because we live in a free democratic society.
NOW with the shape selected, go up to the top Gaussian Blur (Filter>Blur>Gaussian Blur)
I chose 21 pixels because we live in a free democratic society.
Step 4
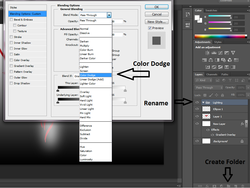
Create a new Folder name it “Light Effects”. Change its blend mode to Color Dodge, and move the ellipse you created to this folder.
Now Break Dance
Now Break Dance
Step 5
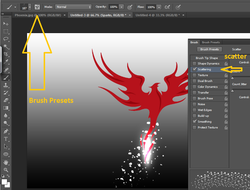
NOW I created I want to create some sparks. I can either create a new file and scatter some point to do a define brush preset (Like the other tutorials we did in class) or click on the brush, and at the toolbar you'll find the Master Brush Presets
For realistic sparks, I choose Scatter. Now when I draw out my sparks, they will be scattered in random places for a better effect.
I also change the colour overlay to give it some flare, but make sure you turn down the opacity
For realistic sparks, I choose Scatter. Now when I draw out my sparks, they will be scattered in random places for a better effect.
I also change the colour overlay to give it some flare, but make sure you turn down the opacity
Step 6 - Smoke
Play around with the different Brushes and Blending options until you find some you like. Be Creative!!!
Smoke Effect PHOTO MANIPULATION
STEP 1:Step 1: Find a photo of someone that you'd like to use. I have chosen a handsome photo of one of the carver students. OR Choose a photo of yourself, or find one on the google machine.
IF there is a background, You can select the magic wand tool to delete the background so only the face shows.
IF there is a background, You can select the magic wand tool to delete the background so only the face shows.
Step 2
Our next step involves creating brushes with a process very similar to our Font Stamping/brush presets.
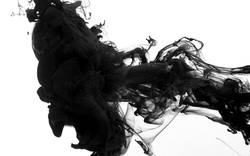
For this step, I found a picture of smoke on the Googling device. Make sure the image you use has a white background. This will make life easier, and you won't have to put your hand up and keep asking for help.
For this step, I found a picture of smoke on the Googling device. Make sure the image you use has a white background. This will make life easier, and you won't have to put your hand up and keep asking for help.
STEP 3
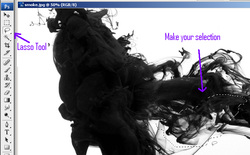
Using the Lasso Tool, make a selection around an area which you think will make a good brush.
Go to EDIT> DEFINE BRUSH PRESET> NAME THE BRUSH
DO this a couple of times
Go to EDIT> DEFINE BRUSH PRESET> NAME THE BRUSH
DO this a couple of times
Step 4
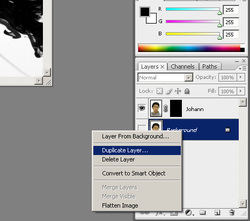
Next Select the Image of your Picture and duplicate it into a new layer. Hide the Original.
Now Click on the duplicated Layer. I called this Johann. Then Go up to the TOOL BAR and find LAYER>LAYER MASK> HIDE ALL.
Now Click on the duplicated Layer. I called this Johann. Then Go up to the TOOL BAR and find LAYER>LAYER MASK> HIDE ALL.
Step 5
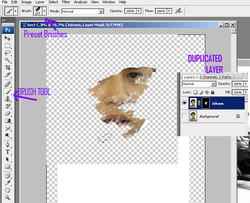
Now I can find my Preset Brushes, Increase the sizes to whatever I wish, and stamp in the image.
Viola!
Viola!
Step 6
When We are finished with that layer, we can play around with the blending options.
Here I right clicked on the Later, choose blending options, and added INNER GLOW with a blue/grey light.
Play around with some of the different effects.
Here I right clicked on the Later, choose blending options, and added INNER GLOW with a blue/grey light.
Play around with some of the different effects.
APPLYING A TEXTURE STEP 1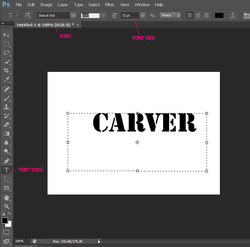
Photoshop Tutorial Yay
Step 1: Open Photoshop CS6 and create a new document. I am using 7 x 5 inches for the dimensions. You can use any size you want because we live in a democratic country. Hooray. After, Use the Horizontal Type Tool (T) add a text. I used "CARVER" for this tutorial. You can use your name or any object you want STEP 2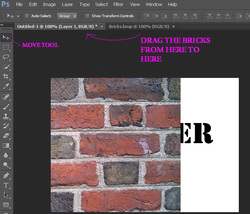
STEP 2: Using the inovation of this thing called "Internet" Find any kind of surface / Texture you want. For this tutorial, I will choose...BRICKS! Oh Yeah! Save the Picture somewhere, then go back to photo shop and go to File->Open. Now Using the move tool bar at the top left tool bar Drag it into the Tab with your text. Make sure it covers the text.
Step 3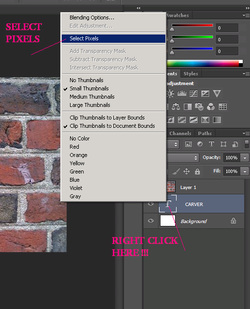
Go to the Layers Panel (Similar to the Layer in FLASH) and select the text layer. Right Click on the [ T ] of the thumbnail of the layer and select "Select Pixel". A dotted marquee selection will be added using the text as reference. You should see it infront of your Bricks now. You can move the text around to find a good area of your TEXTURE / Bricks.
Now Select your Brick Layer on the right side. NEXT On the Top Bar Besides FILE and EDIT and IMAGE you will see a Drop Down for LAYERS. Scroll down to Layer>Layer Mask>Reveal Selection. STEP 4
Now Select your Brick Layer on the right side. NEXT On the Top Bar Besides FILE and EDIT and IMAGE you will see a Drop Down for LAYERS. Scroll down to Layer>Layer Mask>Reveal Selection.
TADA... You did it You applied a texture to something...that was kind of easy. 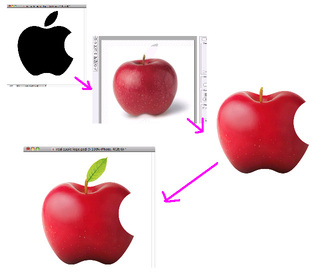
Now I want you to try this with some objects. You can even try putting an Orange Peel Texture on the Apple Logo. Have Fun with it.
IT 10 IF YOU GUYS FINISH ALL THE TUTORIALS, START ON THE GRADE 12 TUTORIALS AT ABDUZEEDO at the top of the pageFebruary: Introduction the Networking
1. Give a definition of a computer network. 2. Give 3 Advantages of Computer networking 3. Give 2 Disadvantages of Computer networking. 4. Every Computer has two different addresses that specifically set them apart from other machines. What are these two types of addresses? 5. What is a modem and what is it responsible for? 6. How do you know a modem is working and transferring data? 7. What is a coaxial cable and what does it do? 8. What is an Ethernet cable and what is its purpose? 9. What is a router? 10. Which port connects to the modem? 11. What is an Ethernet switch, and when would you use one? 12. What are the basic speeds of switches? What is the fastest? 13. What is an uplink? December - Character Storyboards NOVEMBER - Character Creation - Pencil Sketch and Paint/CSflash October Projects - 3 Games: Jeopardy, Maze, Choose your own Adventure October 11th Hardware/Software Test Next Class: Tuesday - Test Guideline Below October 9th Lost Dog / Campaign Poster - Due Thursday Oct. 11 Smart Art Graphs 20 Facts Handout- Steve Jobs and Bill Gates Test Guidelines - What you need to know - Physical Hardware parts (What are they, What do they do, What body function does it relate too) - Storage (RAM, ROM, Volatile vs Non-Volatile, Primary vs Secondary) - Ports (Serial ports, Parallel Ports, USB, SCSI Port) - BIOS - Storage (Kb, Mb, Gb, Tb) - Software: Operating systems - Different platforms, what it does - Network Operating System (NOS) - Utilities and programs and application programs - File management |
Homework Sheets
| ||
